How To Make Focaccia – Easy No-Knead Recipe
This recipe and blogpost is aimed to help you to master artisan-style focaccia in your own kitchen. So let’s have a chat and a deep dive into the world of focaccia, with every step broken down and explained in detail.
The focaccia you’ll make with this recipe is crispy on the outside, soft and airy on the inside, and packed with flavour thanks to a poolish preferment and (optional) cold ferment. If you’ve ever wanted bakery-quality focaccia at home with minimal effort, this recipe will guide you step by step. Perfect for sandwiches, dipping in olive oil, or enjoying on its own.
So, what is focaccia?
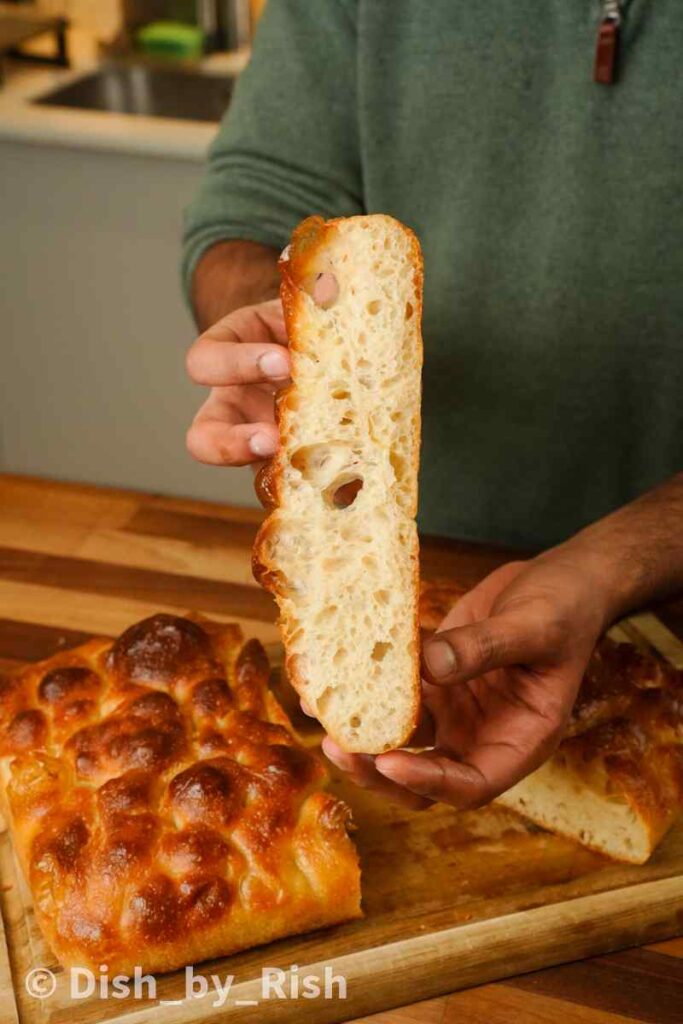
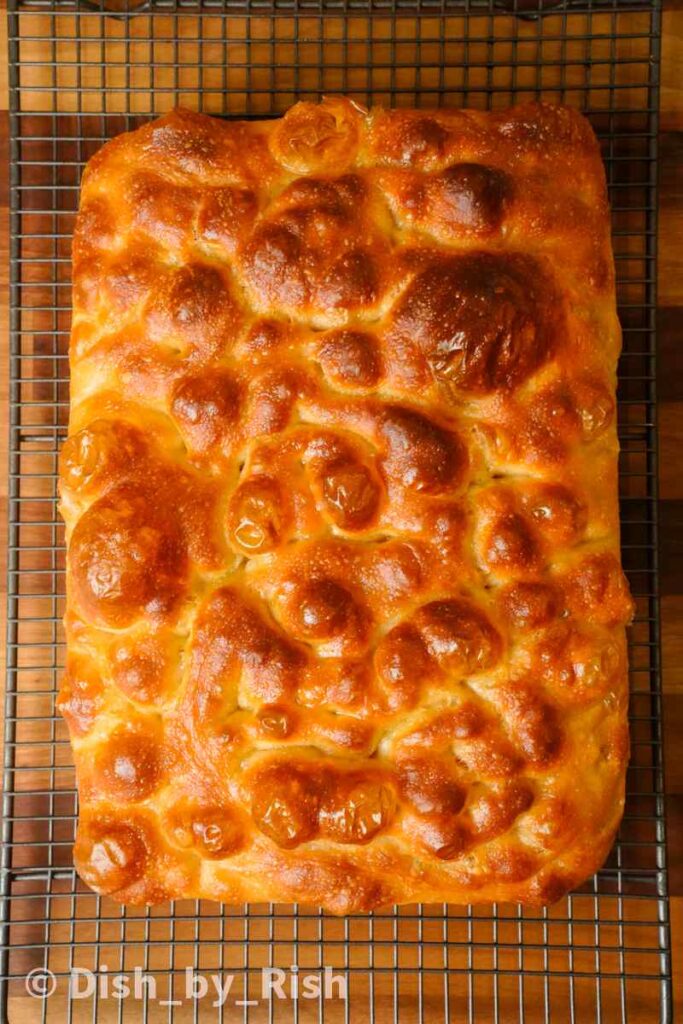
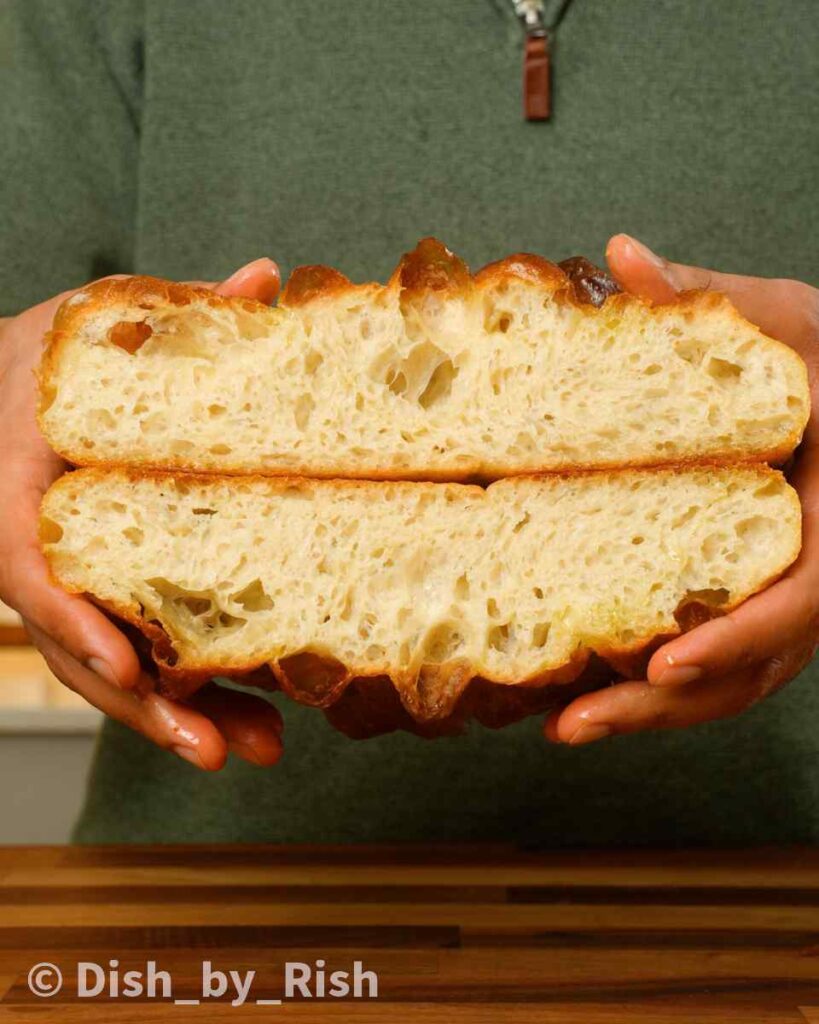
Focaccia is a classic Italian flatbread known for its crisp crust and tender, airy crumb. It’s big, bubbly, and unapologetically irregular. Traditionally shaped in trays, dimpled, and drizzled with copious amounts of olive oil before being baking. This is what helps to create its distinctive texture and golden cratered appearance.
Olive oil plays a key role in focaccia making, it adds flavour, richness, and helps to achieve that signature golden base and crust. It’s an incredibly versatile bread that’s easy to customise with different toppings. It also makes for an exceptional base for sandwiches, and for these reasons it has understandably become a staple in many kitchens.
Here are the reasons why I know you’ll love this focaccia recipe
- Beautifully crisp exterior with a light, airy, irregular crumb
- Deep, developed flavour thanks to the poolish and cold ferment
- Flexible baking schedule that fits around you
- Perfect for sandwiches, appetisers, or dipping
- Easily customisable with your favourite toppings
If you have the time, I recommend reading through all the headings in this blogpost to fully understand the process. Understanding the why in baking is just as important as understanding the how, it really is a science!
Making focaccia with poolish – and why you need to be doing it
This is a great, approachable recipe for all levels of bakers. Using a poolish adds subtle sweetness, improved structure, and flavour complexity, while the cold ferment gives you flexibility and bakery-quality results at home. The dough is high hydration, which gives focaccia its soft, fluffy interior and beautifully caramelised golden crust.
For anyone unfamiliar with poolish, this is a type of preferment (a mixture of flour, water, and yeast) that’s mixed and allowed to ferment ahead of time. It adds more complex and nuances flavours the dough while also increasing extensibility (making it easier to work with). This is the same process I use to make my Homemade Pizza Dough.
How does a poolish work?
This focaccia uses a poolish, which is a type of preferment made with equal parts flour and water, along with a small amount of yeast. It ferments for 24 hours, developing a bubbly, aromatic mixture that will be the driving force to leaven the dough. Other types of preferments also exist, such as biga and sourdough.
Using a poolish has several advantages. The slow fermentation develops flavour complexity with gentle tangy, nutty, and sweet notes. It strengthens the dough naturally without intensive kneading, and it makes the baking schedule more flexible by preparing a portion of the dough ahead of time. It’s a simple way to incorporate artisan techniques into everyday baking.
Why carry out a cold ferment?
Cold ferment = carrying out the proof/fermentation in a cold environment (i.e. the fridge).
- IMPROVED TEXTURE – slower fermentation due to the cold temperatures allows gluten to develop in a more controlled manner. Imagine the gluten to be like the skin of a balloon, the stronger the skin, the more air it can hold. This not only adds extensibility and strength, but also allows for retention of more pockets of gas resulting in a much lighter overall texture
- IMPROVED FLAVOUR – complex starches within the flour are broken down via enzymatic activity into simpler sugars (maltose and glucose for e.g.). These sugars not only provide more substrate for the yeast but they also improve browning (via the Maillard reaction) and introduce more complex, nuanced flavours. Yeast also produce more flavourful byproducts during this time which further enhances flavour
- IMPROVED DIGESTIBILITY – the process of starch and protein breakdown through enzymatic and bacterial activity essentially acts as partial pre-digestion. This improves the overall digestibility of the dough. The digestibility benefit is further enhanced in sourdough due to the addition of lactic and acetic acids. These lower the pH and further break down gluten proteins and phytic acid. Yeasted doughs, however, do not get the benefits of these acids
What I like to do is to cold ferment the poolish AND the bulk fermentation. This involves placing the dough in the fridge for 24-72 hours. Cold fermentation isn’t essential, and you can absolutely bake the dough the same day. But it makes a very noticeable difference in flavour and texture.
This also allows you to shape and bake the focaccia on your own schedule. Which is particularly helpful for busy days or when you want to plan for baking fresh bread on a different day.
Understanding dough hydration and why it matters
Dough hydration refers to the quantity of liquid relative to the amount of flour. A 100% hydration dough for example would be made with equal parts water to flour. It impacts the crumb structure, crust, handling, and gluten development.
I’ve opted for a higher hydration here which creates a soft, moist, and chewy interior. The higher hydration also allows for a more open crumb with larger air pockets. The dough will be a lot wetter and stickier than what you may be used to, which is why there’s no kneading here.
Instead, we’re using a method of folding to help align the gluten strands to create strength and structure. This is the perfect gentle method when working with higher hydration doughs.
Adding oil to focaccia dough? Does timing matter?
You should absolutely add oil to focaccia dough. It helps to create that soft, moist, chewy interior as well as that golden crisp crust! Oil has to go IN the dough, ON the dough, and IN the pan for best results.
While oil is a key ingredient for flavour and texture, it can also inhibit gluten development. To ensure we have a strong structure and gluten network (to hold all those air pockets), I recommend adding the oil later in the process. Rather than adding it at the start, we’ll add it after the 45 minute autolysis. This allows the gluten development to get a head start.
Let’s break down the key stages of making focaccia
Let’s talk about some of the ingredients
I’ll cover the main ones below but the full recipe can be found at the end of the post
- Strong white bread flour – high protein flour is essential for developing gluten, which gives focaccia its structure and aids in achieving an airy crumb. I use a Canadian wheat flour with a protein content of 14g/100g
- Instant dry yeast – just a small amount is used in the poolish and this is added directly to the flour (no activation needed)
- Extra Virgin Olive oil – used throughout the dough and generously on the pan and surface, adding flavour and helping create that golden crust
- Optional toppings – rosemary and sea salt are traditional, but tomatoes, olives, caramelised onions, or garlic confit work beautifully too. I love brushing garlic butter on after the focaccia has baked
The key tips for making this focaccia
- Use wet hands when handling the dough – this prevents sticking and allows you to stretch and fold without adding excess flour
- Allow the poolish to fully mature – it should be bubbly and domed with a slightly sweet, fermented aroma.
- Don’t rush the bulk fermentation – wait until the dough has visible air bubbles around the sides and top
- For maximum flavour and optimum texture, use the optional cold ferment – even 24 hours in the fridge can make a huge difference
- Be generous with the olive oil – it helps to achieve the characteristic crisp crust and adds flavour
How to make focaccia (step by step photos)
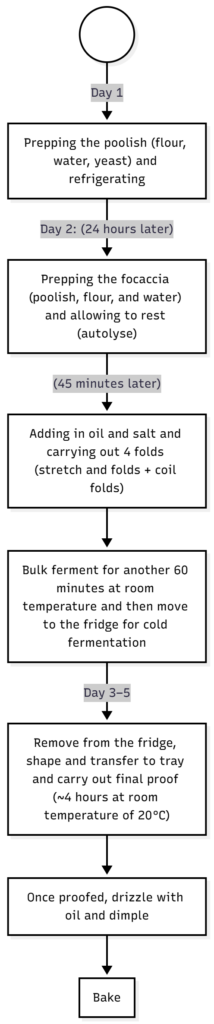
First, let’s prep the poolish
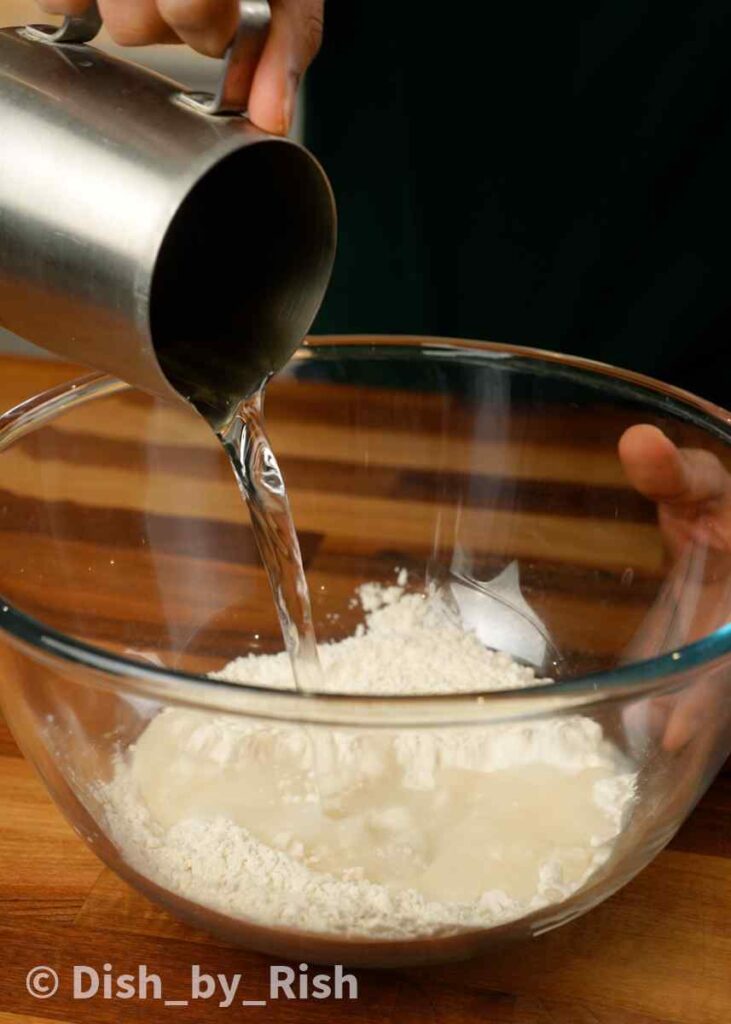
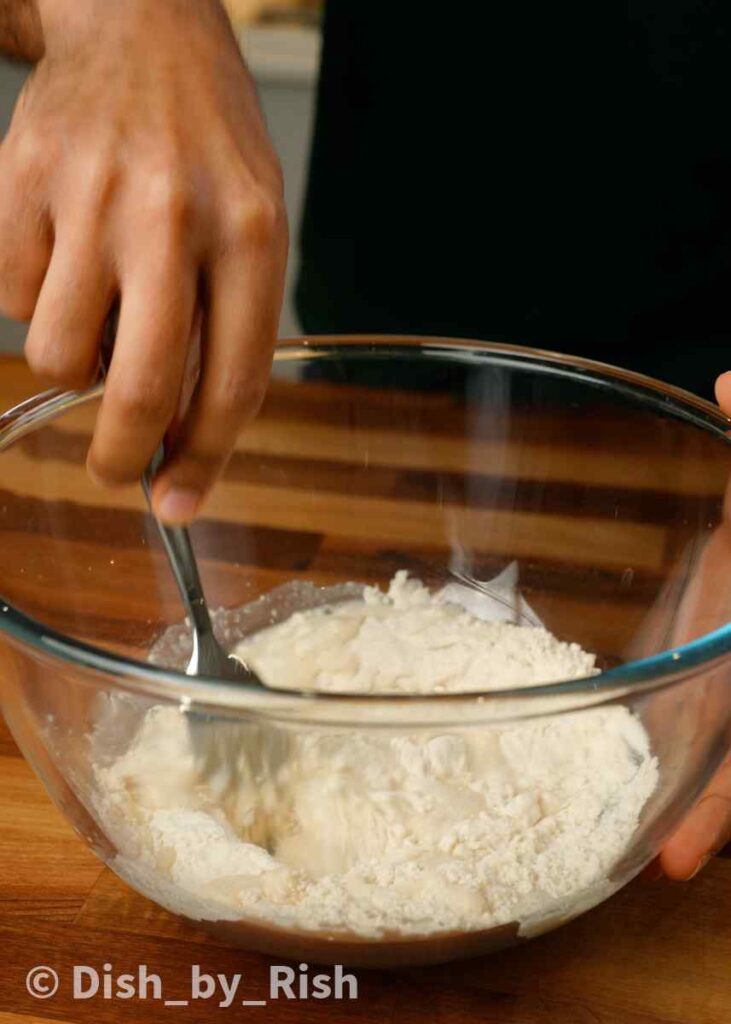
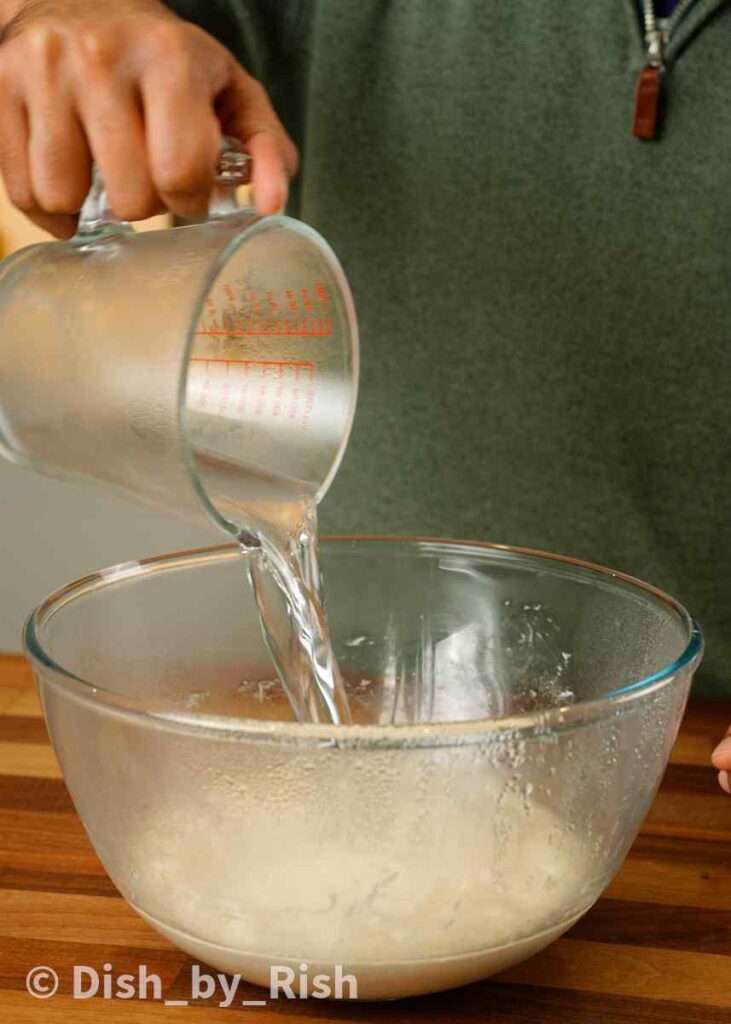
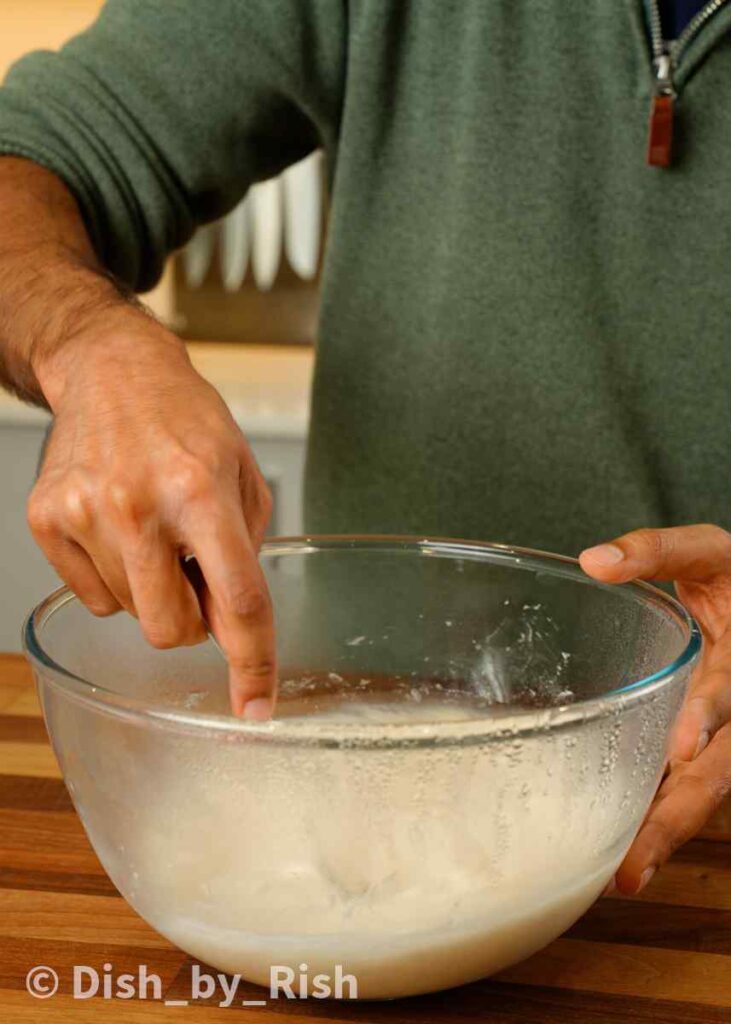
Mix the flour, yeast, and water until incorporated, then cover and proof at room temperature for 12 hours, or in the fridge for 24-48 hours.
Next, prepping the focaccia dough
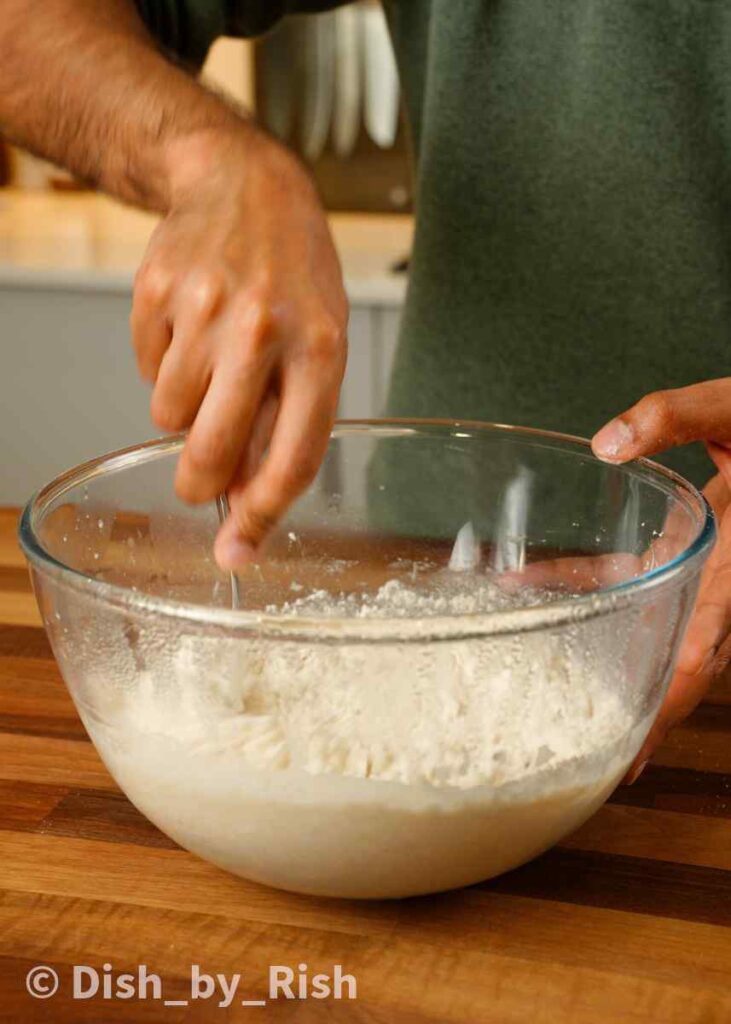
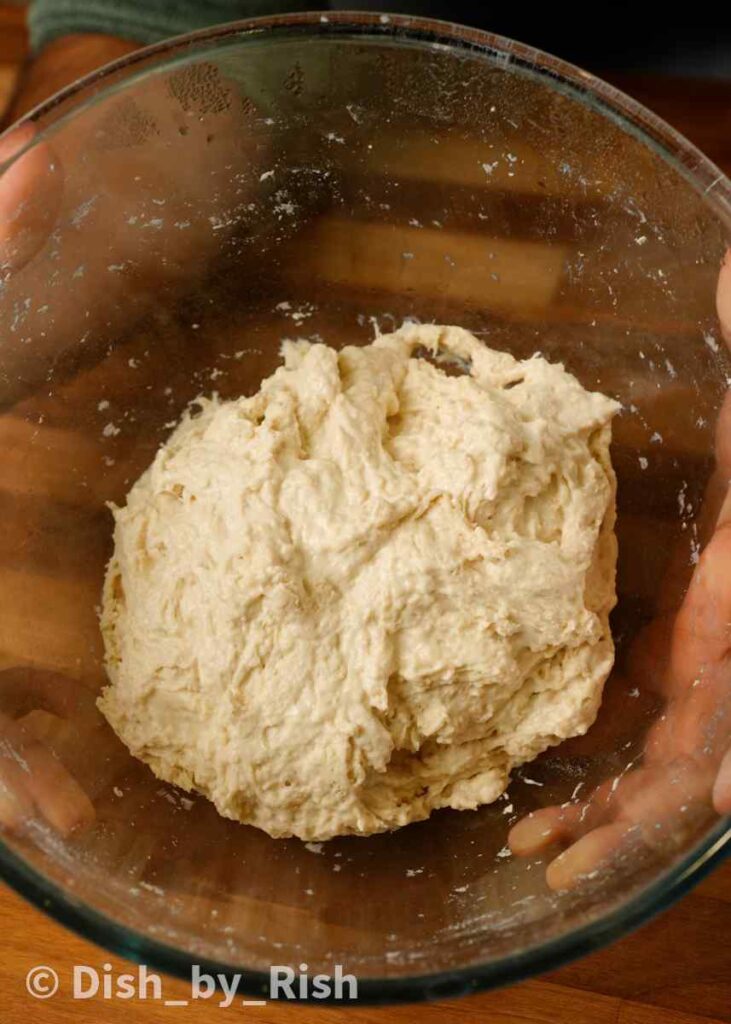
Mix the fermented poolish and water together before adding in the flour and mixing once again until it forms a rough and shaggy dough.
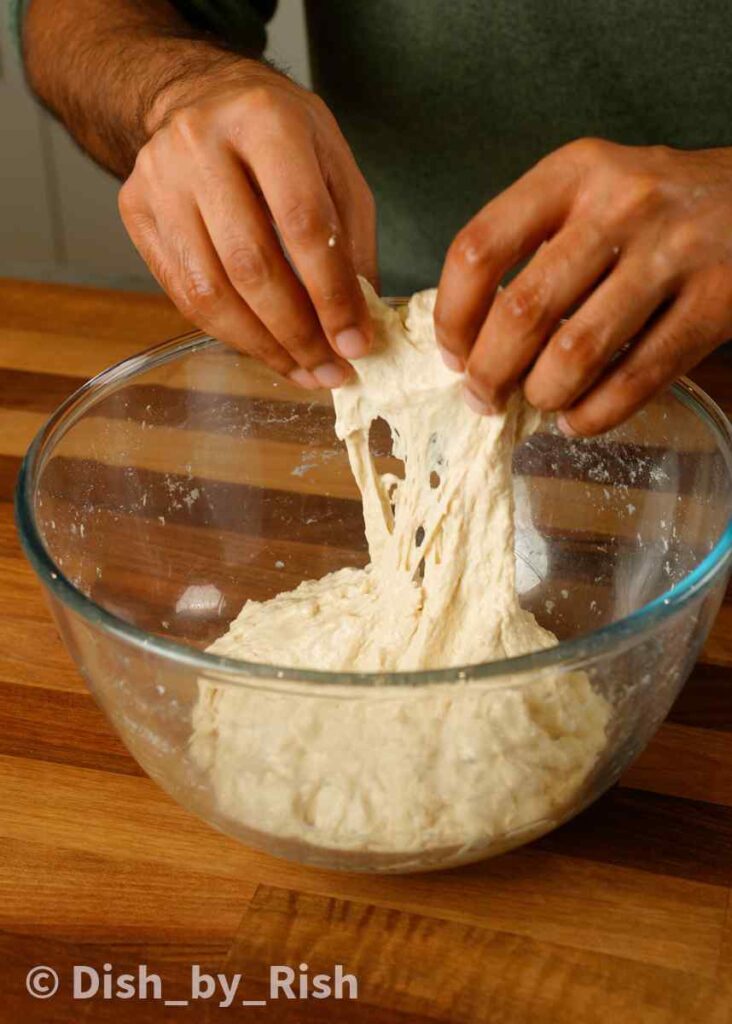
Cover and leave the dough to rest for 45 minutes. This is known as the autolyse and it allows the gluten to naturally start developing. The dough will be substantially stronger after the autolyse (as shown by the windowpane test – no tearing!).

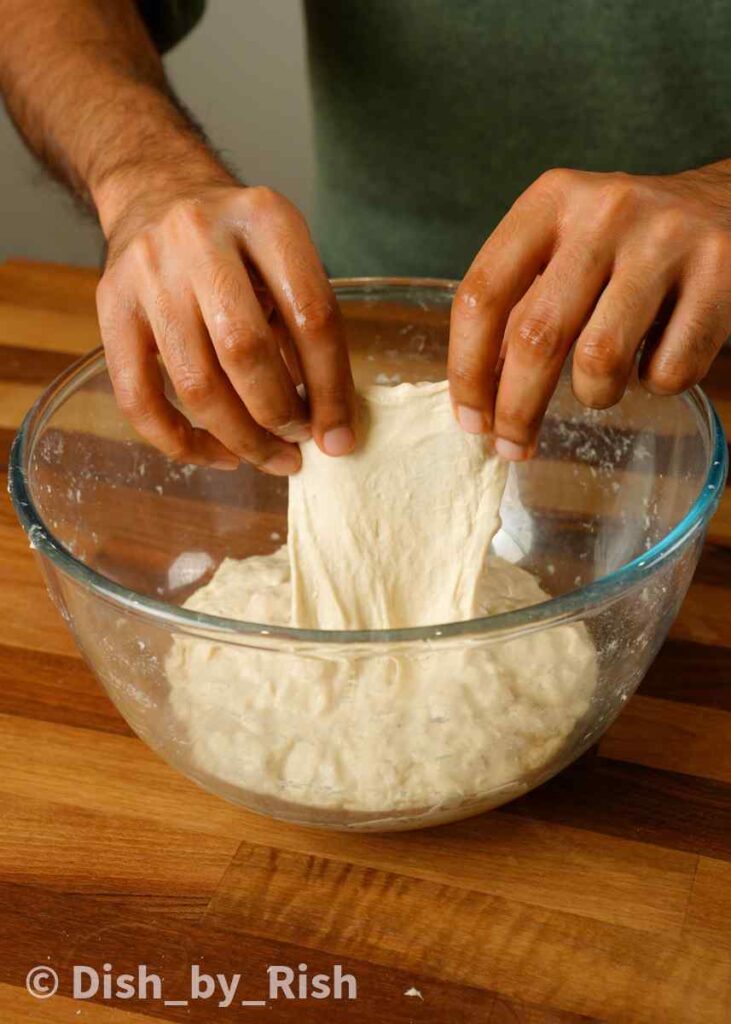
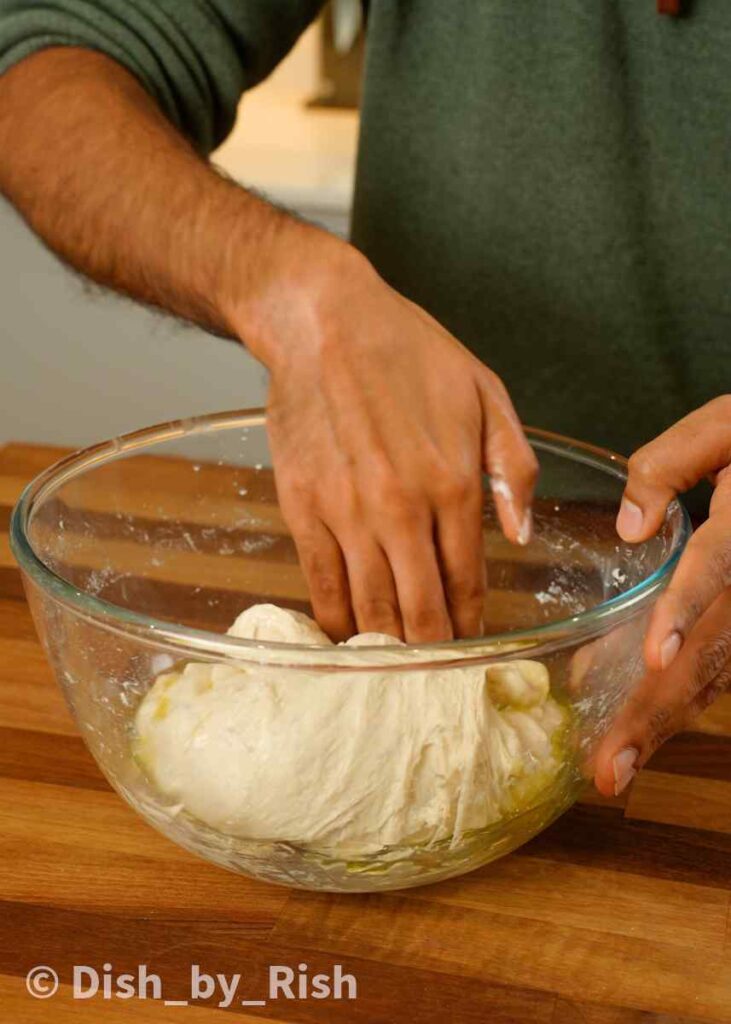
Add in the oil and salt and start doing some stretch and folds to incorporate them.
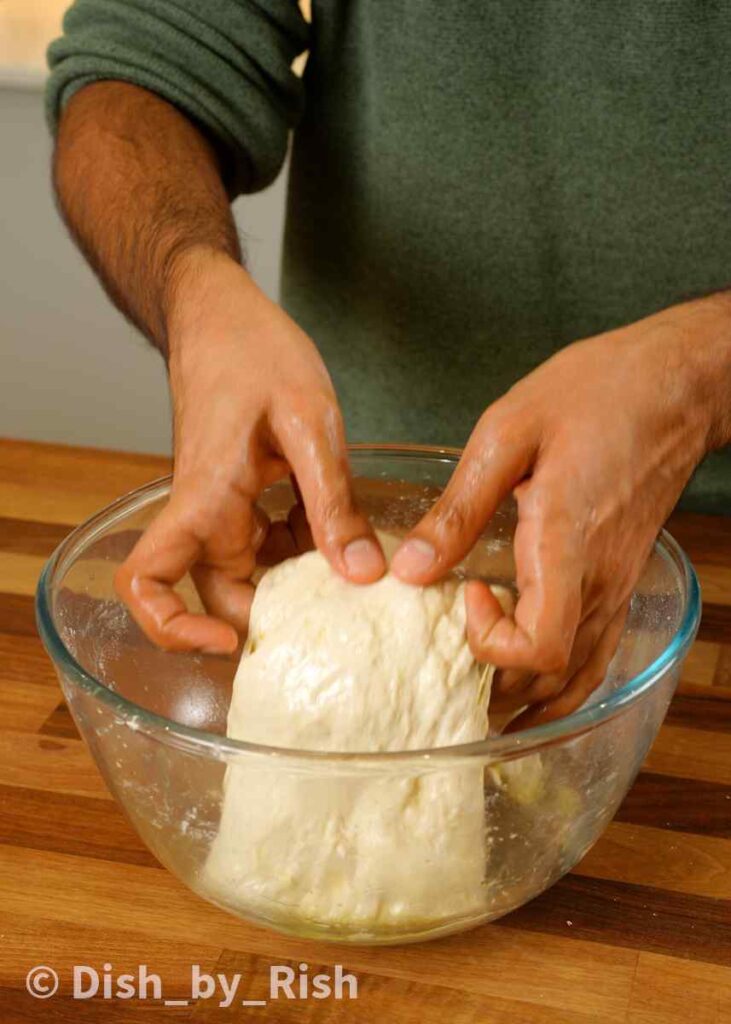
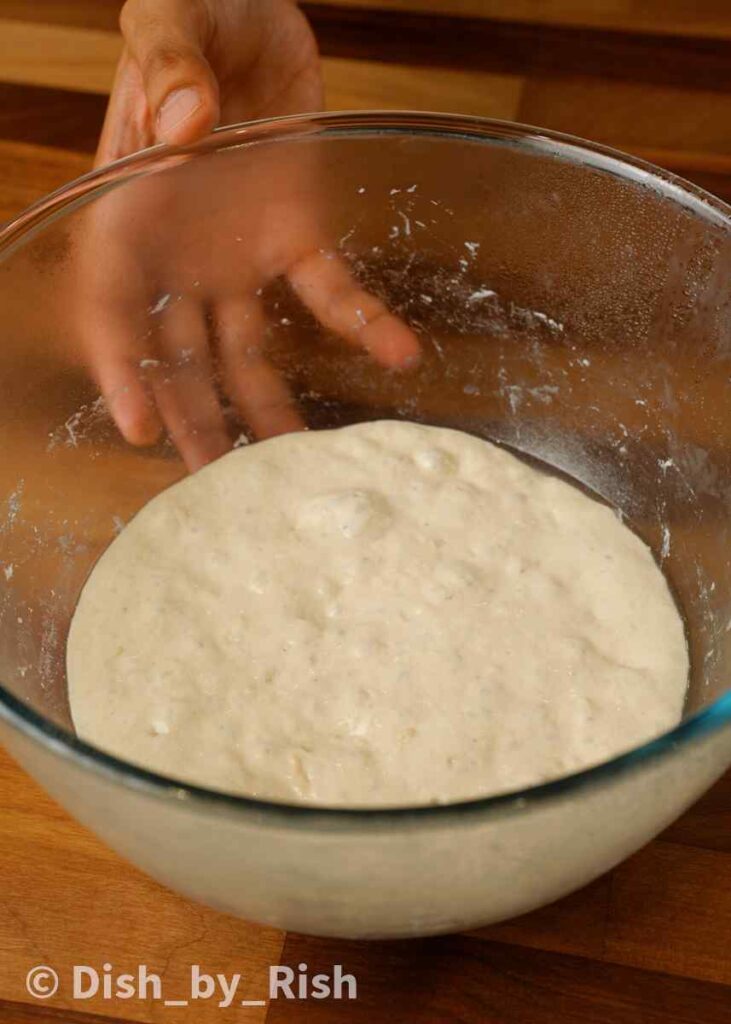
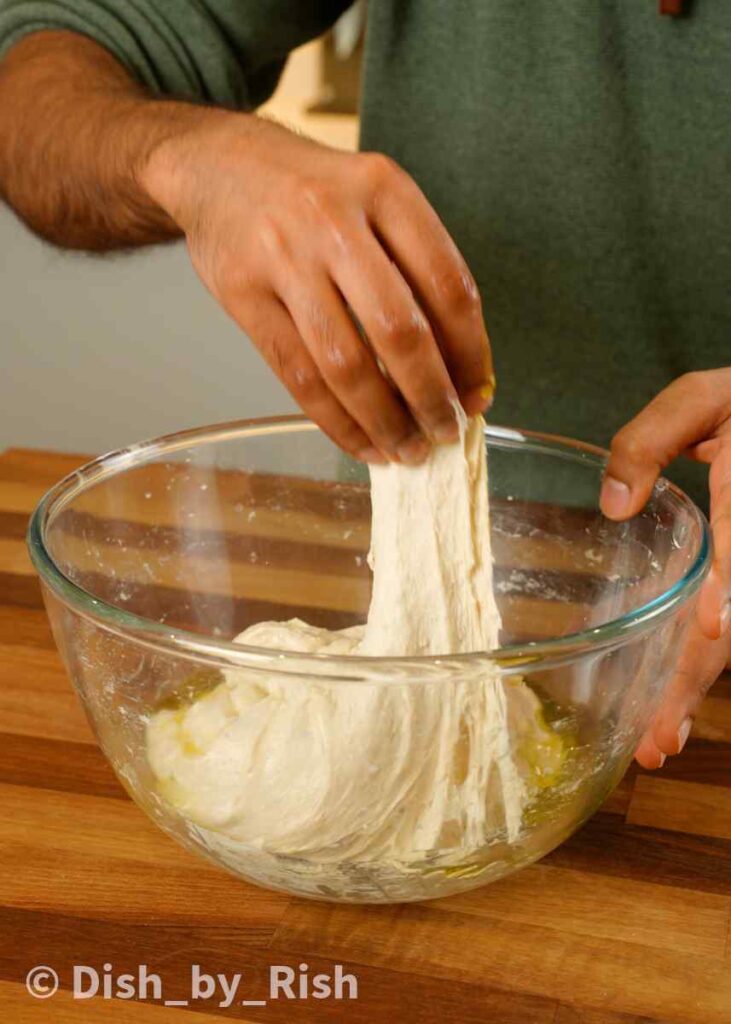
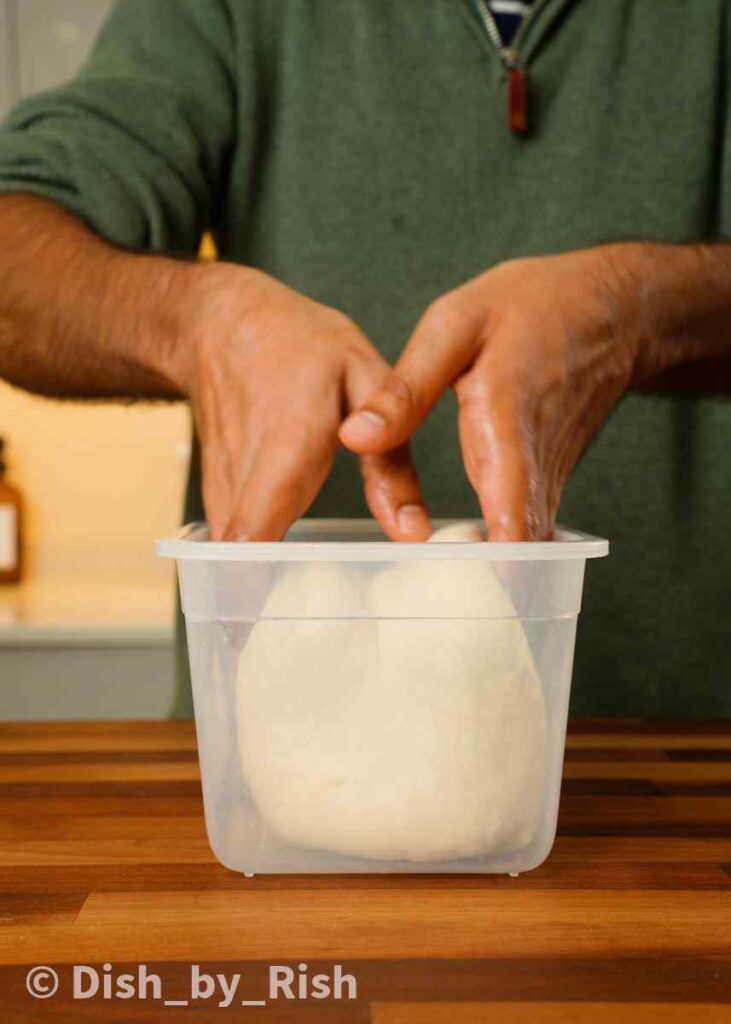
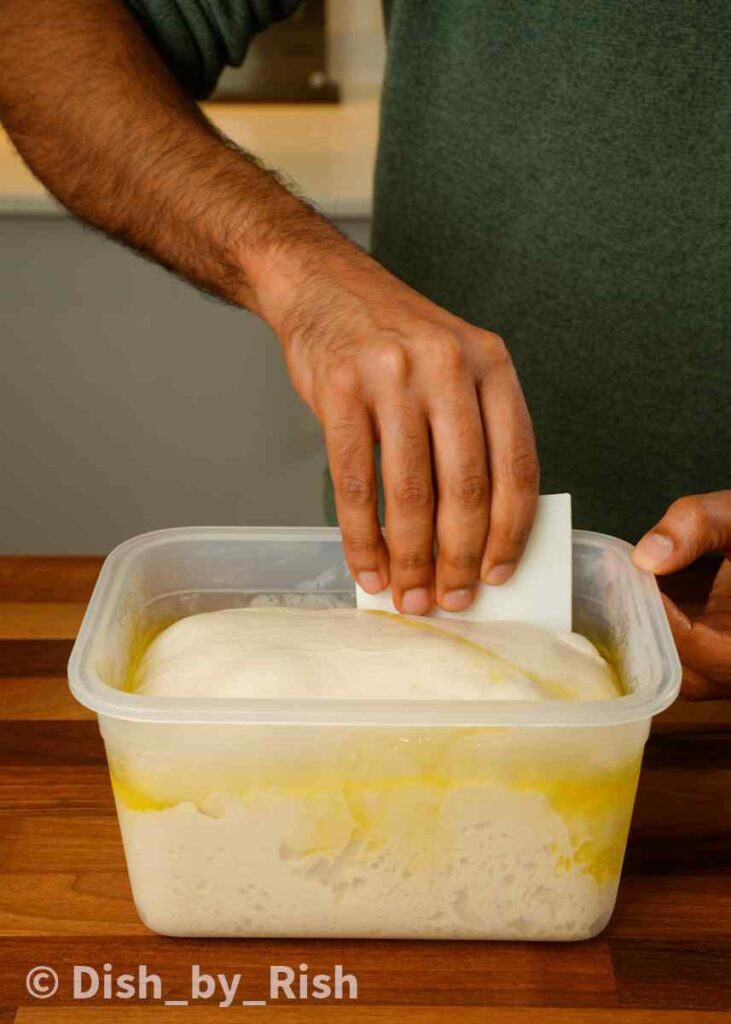
After stretch and folds, carry out 3 rounds of coil folds with 15 minute rests between each round. This is a gentle technique that will develop more structure and strength. After, allow the dough to finish proofing (if baking on the same day), or for best results transfer to the fridge to cold proof for 24-72 hours.
Finally, baking the focaccia
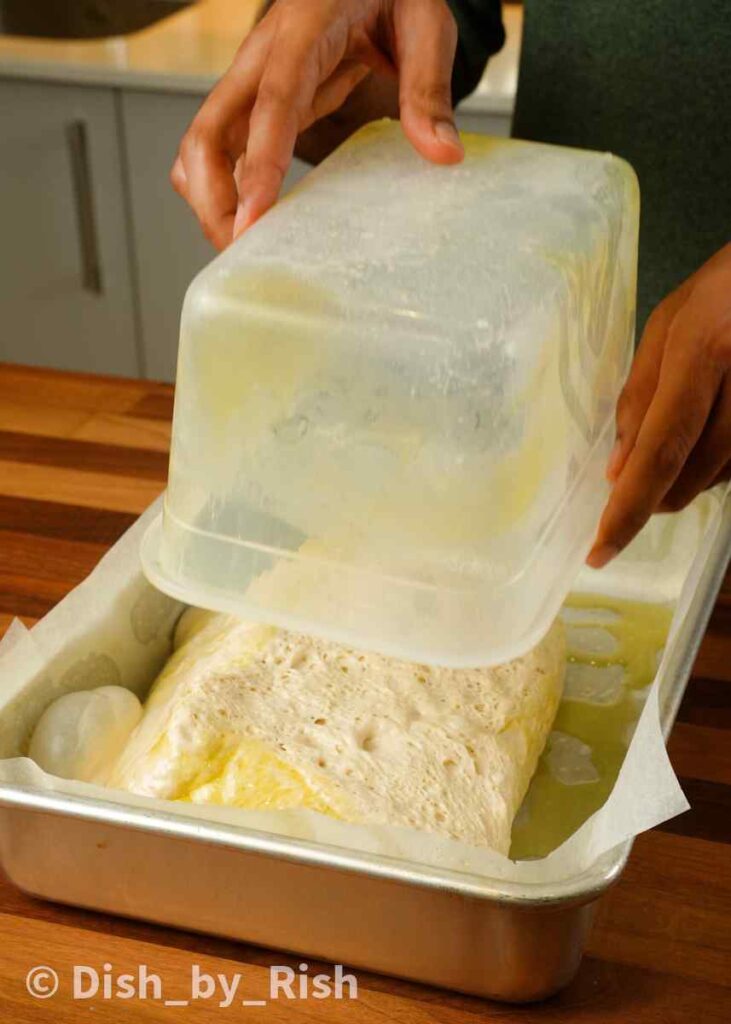
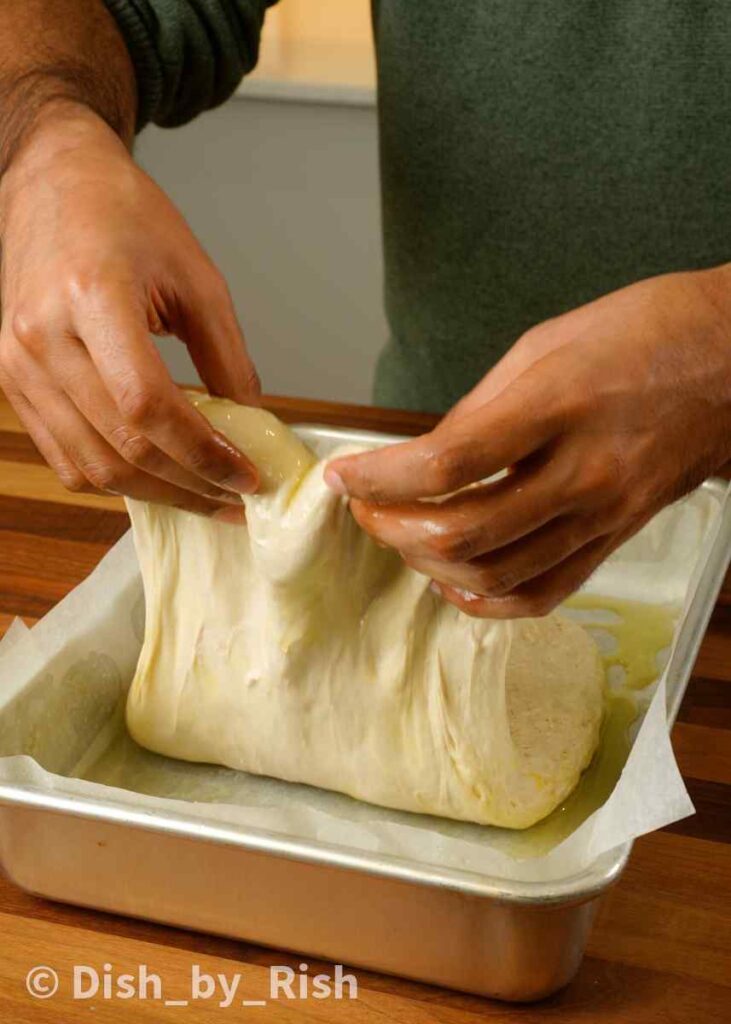
After proofing, gently loosen the dough from the container and dump the dough out into an oiled and lined baking tin. Carry out a simple letter fold to make it easier to flip the dough over.
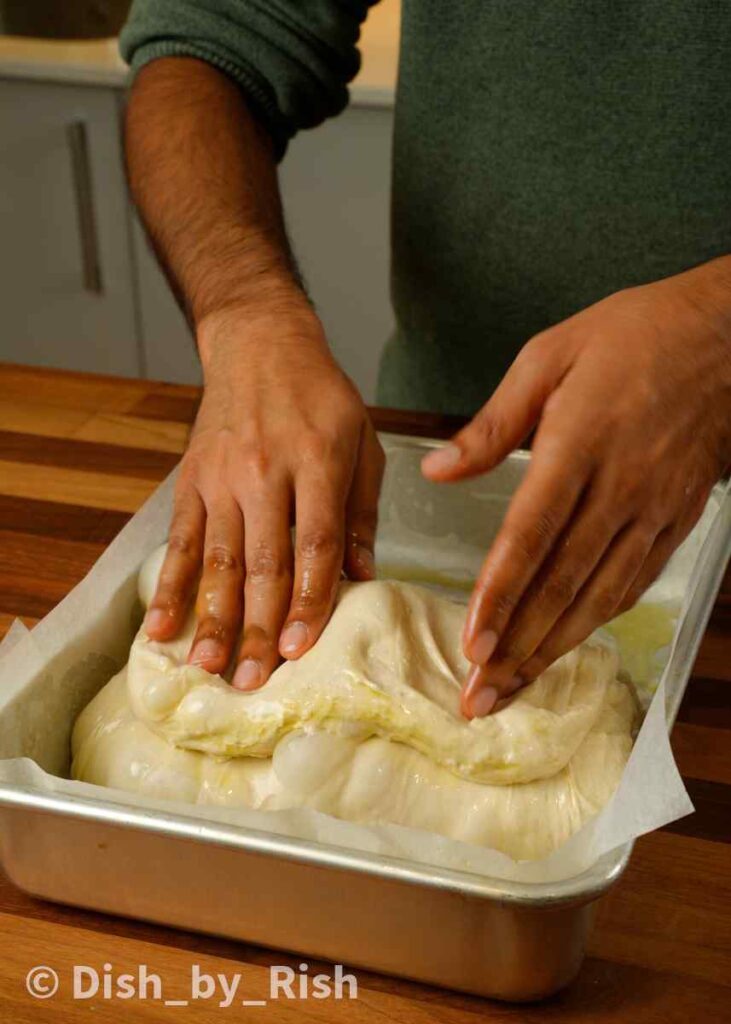
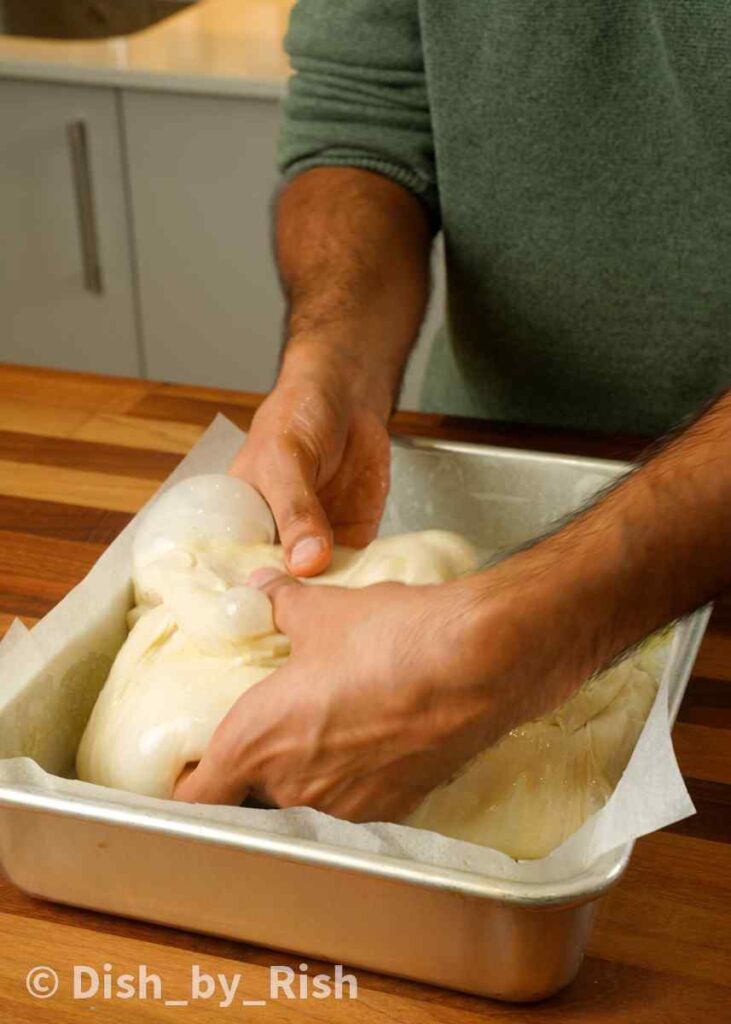
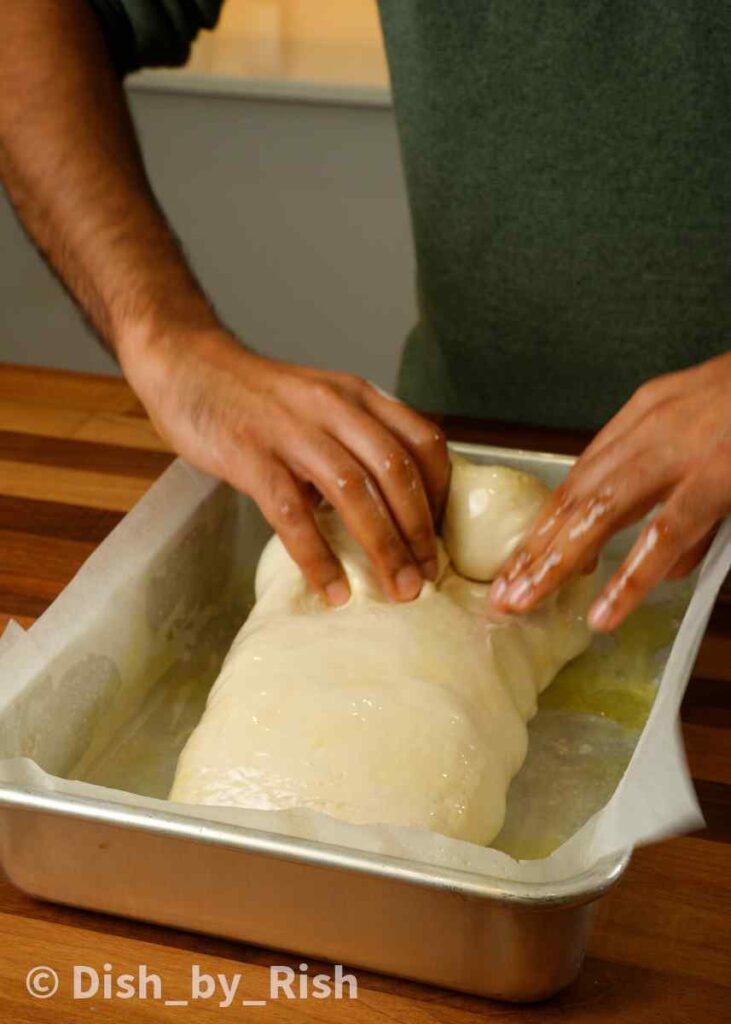
Make sure the long side of the dough is aligned with the long side of the tray.
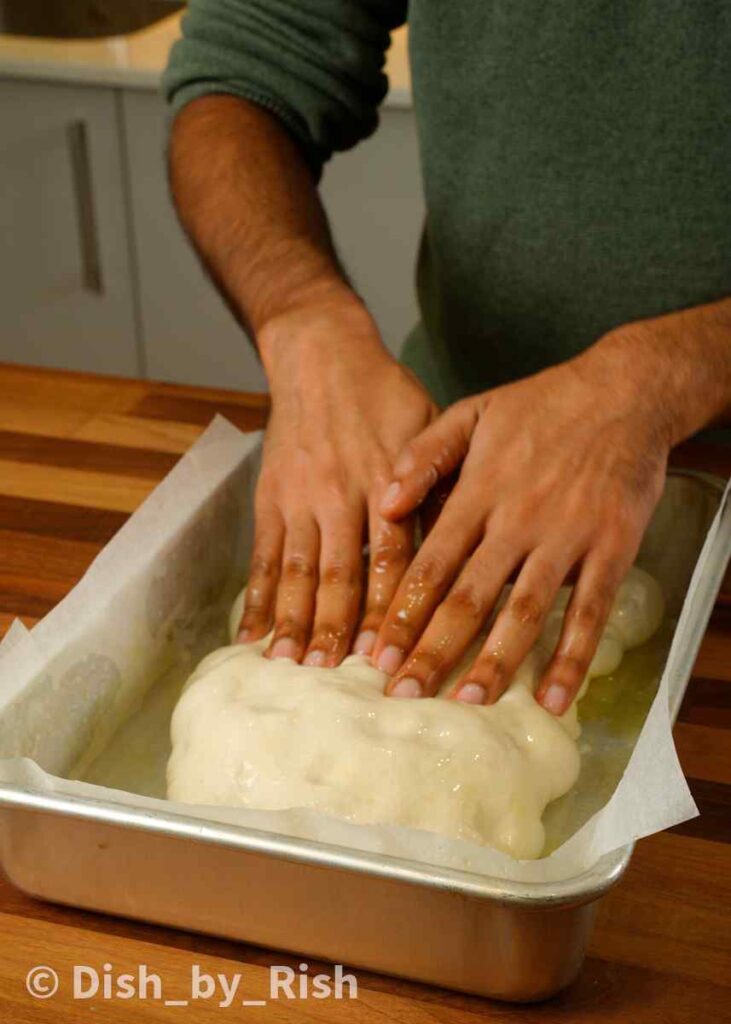
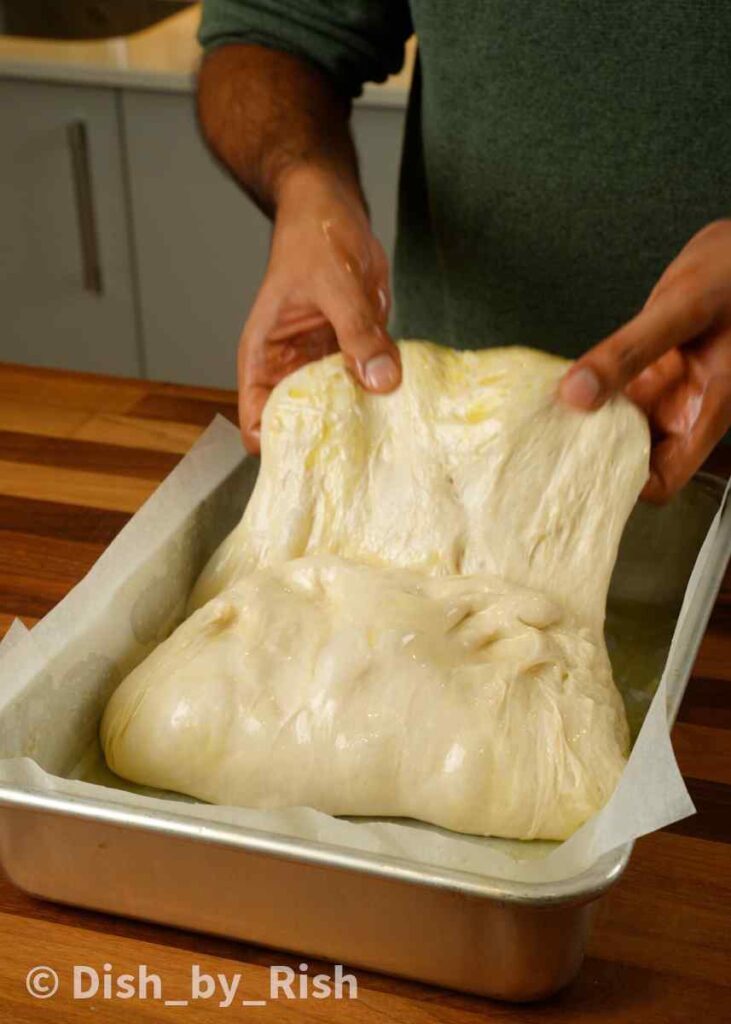
Very gently, press the dough down slightly to stretch it out. It doesn’t need to fill the tray right now, it will naturally do this as it proofs and relaxes.
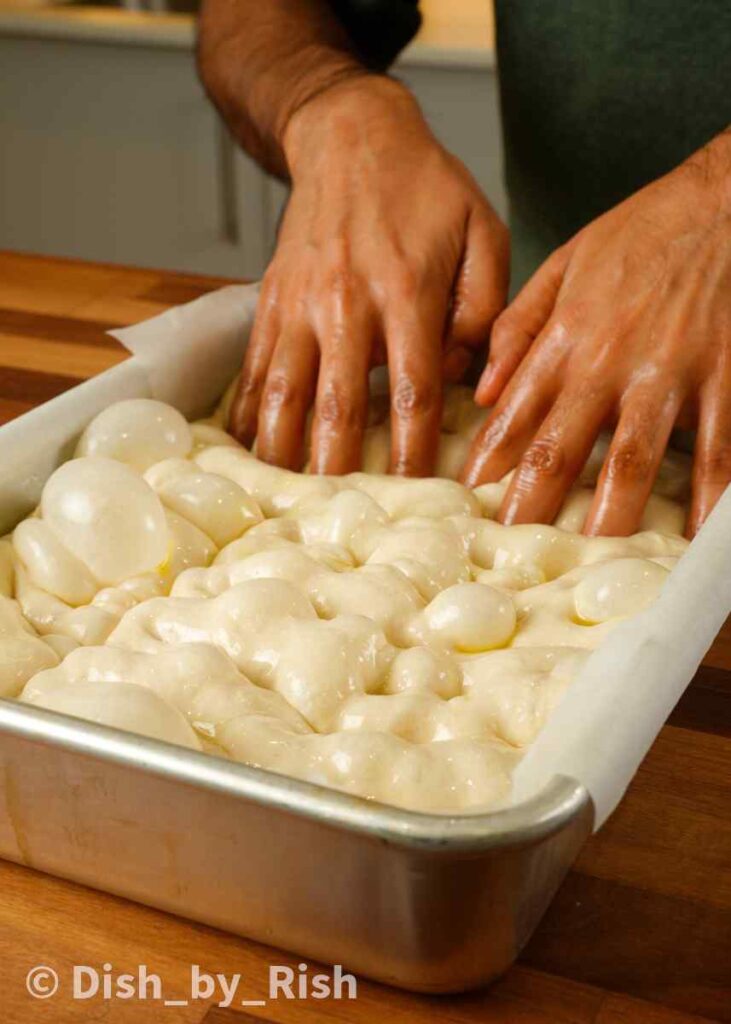
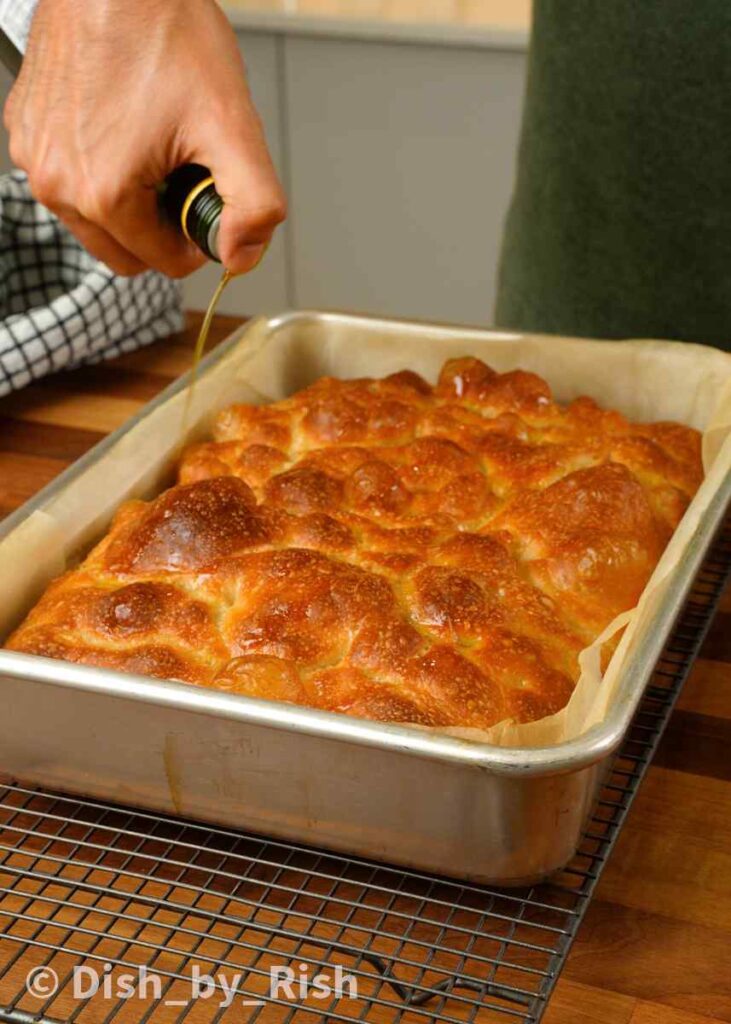
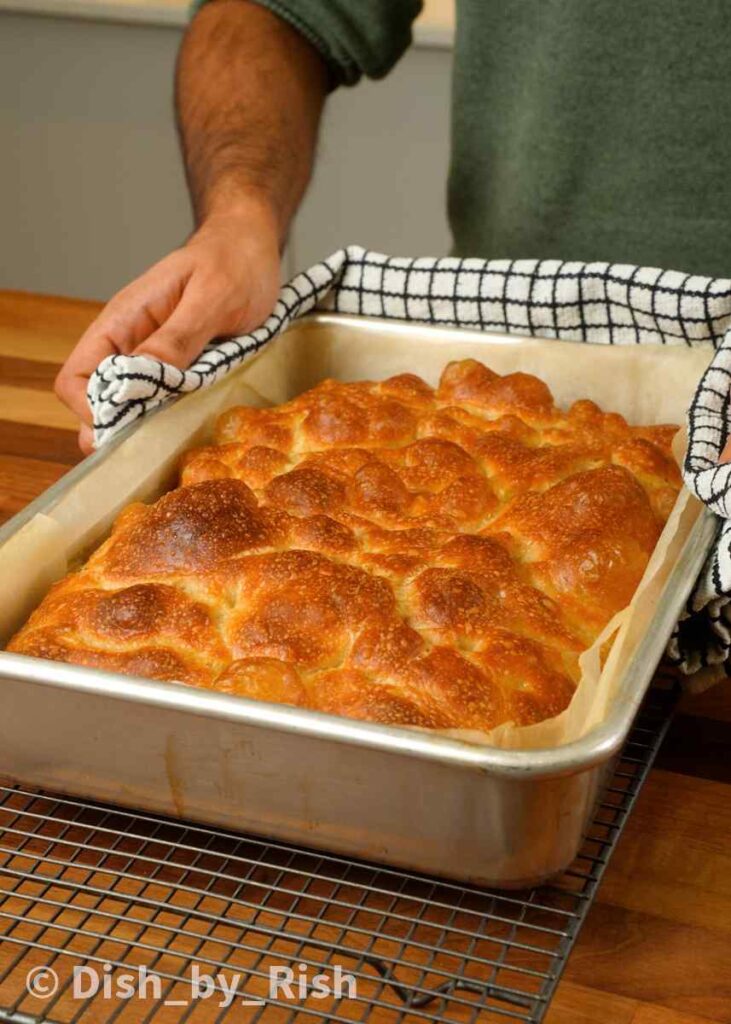
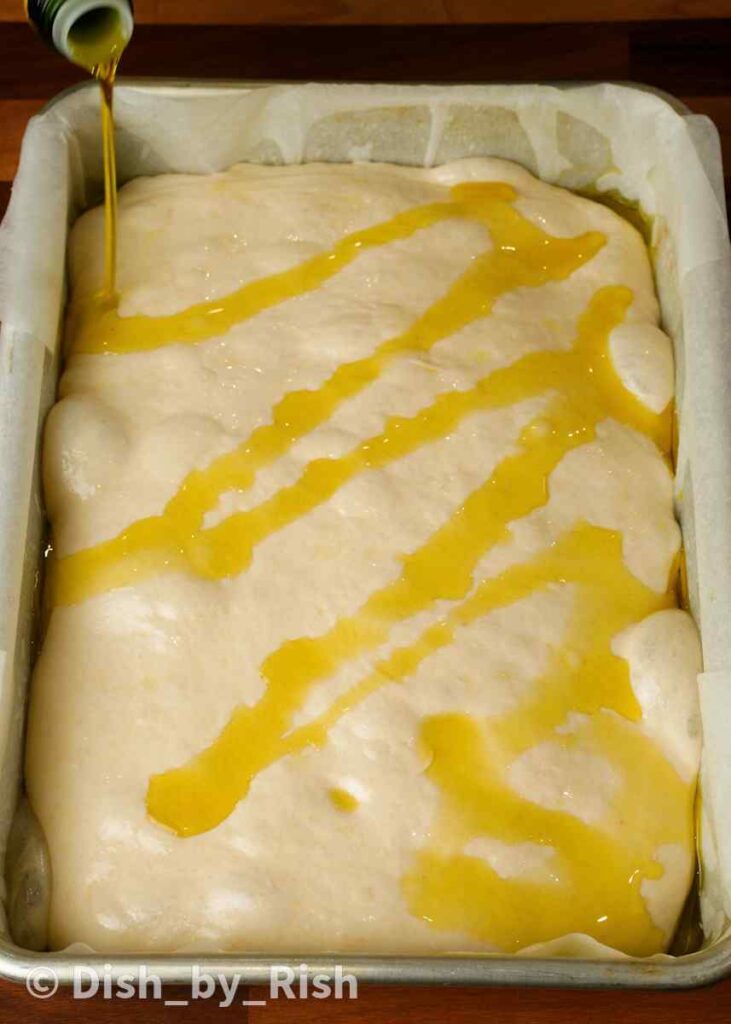
Drizzle with olive oil and dimple firmly with your fingertips. Transfer to the oven and bake until golden brown. Immediately finish with another drizzle of olive oil and transfer to a wire rack to cool.
Frequently asked questions
How long will the focaccia keep? What’s the best way to store it?
It will keep in an airtight container at room temperature for 3-4 days. It can also be wrapped in clingfilm and frozen for 5-6 months.
Refrigerating focaccia makes it stale and dry faster, so I wouldn’t recommend this unless you have perishable toppings.
How to reheat leftover focaccia?
My preferred method is to wrap tightly in foil and air fry/bake at 150’C for 10 minutes. The edges crisp up slightly and the interior steams and softens, making it taste like it was just freshly baked!
If you enjoyed this recipe
Please do let me know! Leave a review and a rating below, I’d love to know how you got on.
You can also tag me on Instagram at @dish_by_rish. Or follow me on Facebook, Pinterest, Youtube, and TikTok to keep up with all my cooking and baking creations.
Until then, happy baking!
Focaccia recipe

Focaccia
Learn how to make focaccia with a poolish and optional cold ferment. Crispy on the outside, soft and airy inside, perfect for sandwiches.
Ingredients
For the poolish:
- 125g strong white bread flour
- 125g room temperature water
- 1g instant dried yeast
For the remaining dough:
- 375g strong white bread flour
- 300g fridge cold water
- 10g salt
- 20g extra virgin olive oil
Extra:
- Extra olive oil for the tray and drizzling
Instructions
For the poolish:
- Mix the flour, yeast, and water (from the poolish section) in a large mixing bowl until incorporated. Cover, and allow to sit at room temperature for 60 minutes to kickstart yeast activity
- Then, transfer to the fridge to ferment for 24-48 hours. This can also be left at room temperature for 8-10 hours, however cold proofing in the fridge will provide better flavour development
For the focaccia dough:
- Mix the fermented poolish and water (from the dough portion) together before adding in the flour and mixing once again until it forms a rough and shaggy dough
- Cover and leave the dough to rest for 45 minutes. This is known as the autolyse and it allows the gluten to naturally start developing. The dough will be substantially stronger after the autolyse (as shown by the windowpane test - no tearing!)
- Next, add in the oil and salt and start doing some stretch and folds to incorporate. See the photos in the step by step above to guide you with the folding. All of the oil won't be incorporated within the first set of folds, just aim to keep stretching and folding until ~80-90% of the oil has been incorporated. Cover and rest for 15 minutes
- After 15 minutes, the next set of folds are coil folds. Do 3 sets of these with 15 minute rests between each set, once again see photos above to guide you with this fold. This is a gentle technique that will develop more structure and strength
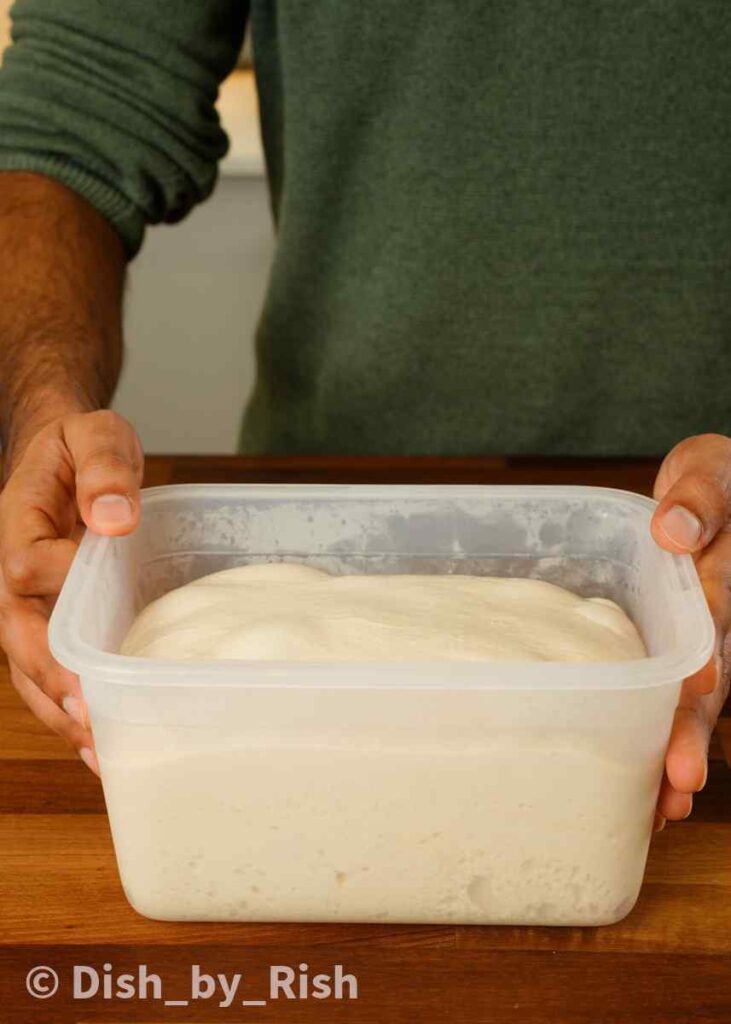
- Once the folds have been completed, either allow the dough to finish proofing at room temperature (approx. 2 hours at 20'C), if baking on the same day. Or for best results transfer to the fridge to cold proof for 24-72 hours
Baking the focaccia:
- Prep a 9"x13" baking tin by lining with baking paper and covering the base and sides with a generous layer of olive oil
- After proofing, pour a small amount of oil around the sides of the dough to aid with removal. Gently loosen the dough from the container and dump the dough out into the tin
- Carry out a letter fold to make it easier to flip the dough over (see photos for visual guide). Once flipped, make sure the long side of the dough is aligned with the long side of the tray and the seam of the fold is at the base
- With oiled fingers, very gently press the dough down slightly to flatten it out. It doesn't need to fill the tray right now, it will naturally do this as it proofs and relaxes
- If the dough was cold proofed, it will require approx. 4 hours to proof at a room temperature of 20'C. If the dough was proofed at room temperature, it will require 1-2 hours. Note: warmer temperatures will proof more quickly, slower will take longer. The dough will be ready when it has filled out the tray, risen significantly with a domed appearance around the sides, looks pillowy and puffy, and has well defined large bubbles visible on the top surface
- One hour before baking, pre heat your oven to 220'C (fan)/240'C (conventional) - 430'F (fan)/465'F (conventional)
- Once the dough is proofed and ready, drizzle olive oil generously over the top. With oiled fingers, dimple firmly ensuring you're pressing downwards and not flat. Transfer to the oven and bake for 25-30 minutes or until golden brown. Immediately finish with another drizzle of olive oil and transfer to a wire rack to cool
Notes
Frequently asked questions
How long will the focaccia keep? What's the best way to store it?
- It will keep in an airtight container at room temperature for 3-4 days. It can also be wrapped in clingfilm and frozen for 5-6 months.
- Refrigerating focaccia makes it stale and dry faster, so I wouldn't recommend this unless you have perishable toppings.
How to reheat leftover focaccia?
- My preferred method is to wrap tightly in foil and air fry/bake at 150'C for 10 minutes. The edges crisp up slightly and the interior steams and softens, making it taste like it was just freshly baked!
Nutrition Information
Yield 8 Serving Size 1Amount Per Serving Calories 184Total Fat 5gSaturated Fat 1gUnsaturated Fat 4gSodium 791mgCarbohydrates 31gFiber 2gSugar 4gProtein 6g
Note: This is an automated calculation and hence may not be entirely accurate.
Soooooo good! I’ve tried so many focaccia recipes over the past two years and this one was just perfect. Thank you!!